

Introduction
Halloween baking should feel fun, not stressful, and that’s exactly the spirit behind this list of easy Halloween desserts. Whether you’re stocking a school party table, hosting a small gathering, or just want something festive to bake with the kids, you need options that are quick to pull together but still look like you spent all afternoon on them. That’s why this roundup rounds up 25 Halloween party treats spanning no-bake bark, spooky cookies, pumpkin-flavored bites, and classic candy-drawer favorites, so there’s something here no matter your schedule or skill level.
From that list, five recipes stood out as the strongest all-around picks. They were chosen for how easy they are to make, how well they photograph, and how much they’ll actually get eaten at your next get-together. Below, you’ll find the full lineup of 25 ideas, followed by complete, step-by-step recipes for the five best Halloween desserts worth making this year.
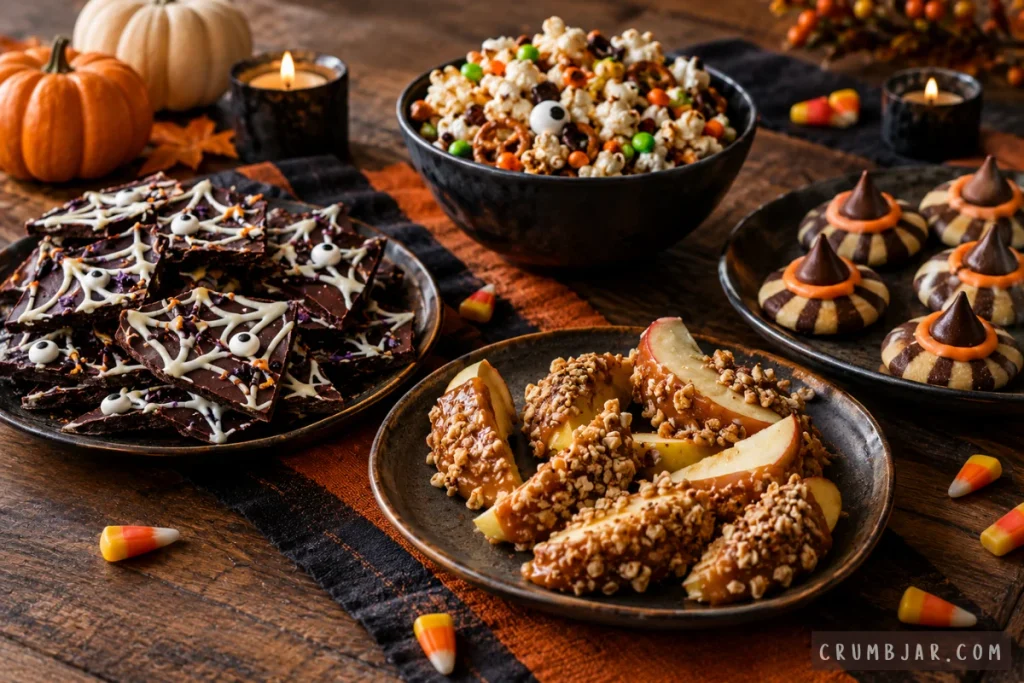
At a Glance: The 25 Desserts
- Chocolate Spiderweb Bark
- Candy Corn Fudge
- Mummy Brownies
- Black Cat Cupcakes
- Meringue Ghost Cookies
- Oreo Pumpkin Truffles
- Jack-o’-Lantern Rice Krispie Treats
- Witch Hat Cookies
- Caramel Apple Slices
- Pumpkin Mochi
- Monster Popcorn Mix
- Chocolate-Dipped Pretzel Brooms
- Spooky Eyeball Cake Pops
- Pumpkin Chocolate Chip Cookies
- No-Bake Peanut Butter Spiderweb Bars
- Graveyard Pudding Cups
- Halloween Snack Mix Bark
- Mini Pumpkin Cheesecakes
- Candy Corn Popcorn
- Halloween Whoopie Pies
- Pumpkin Roll Cake
- Halloween Popcorn Balls
- Candy Eyeball Chocolate Clusters
- Chocolate Peanut Butter Spider Cookies
- No-Bake Pumpkin Spice Cheesecake Bites
- Chocolate Spiderweb Bark
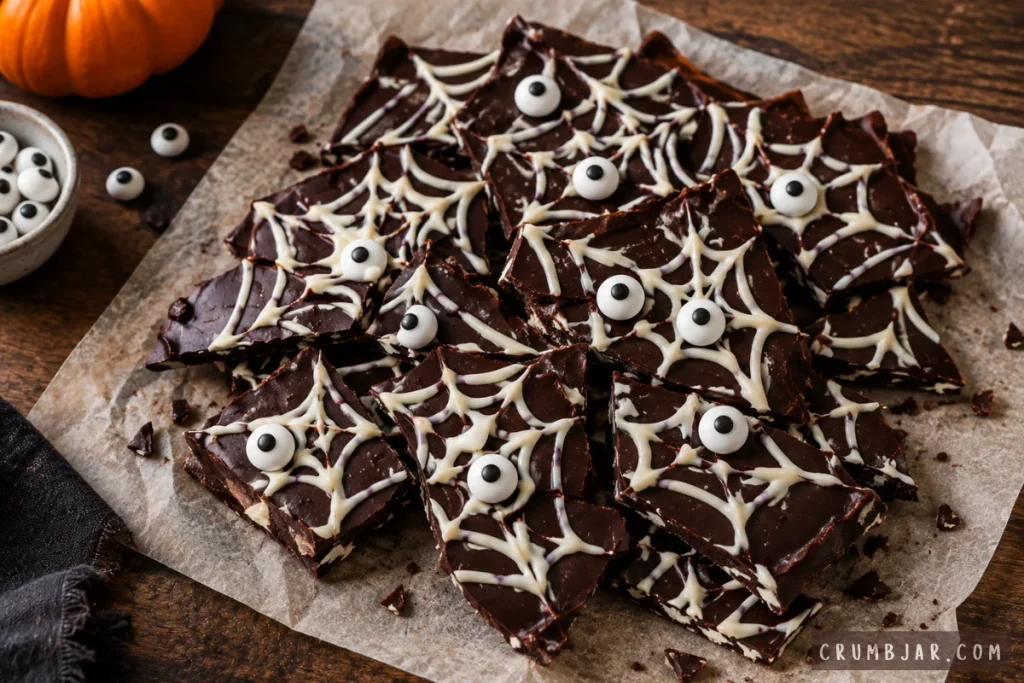
A layer of melted dark chocolate swirled with white chocolate webs makes this one of the simplest no-bake Halloween desserts on the list. It sets in the fridge in under an hour and breaks into rustic, shareable pieces. ⭐ Top 5 Pick - Candy Corn Fudge
Creamy vanilla fudge layered to mimic the colors of candy corn is a fun twist on a classic no-bake treat. It’s sweet, nostalgic, and easy to cut into neat squares for a dessert table. - Mummy Brownies
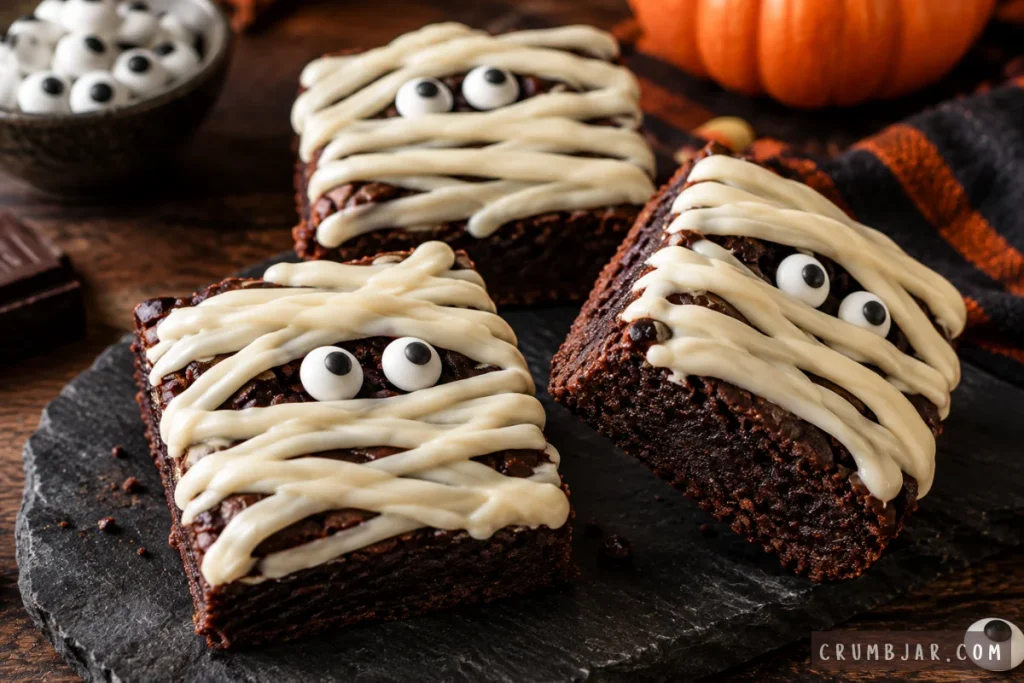
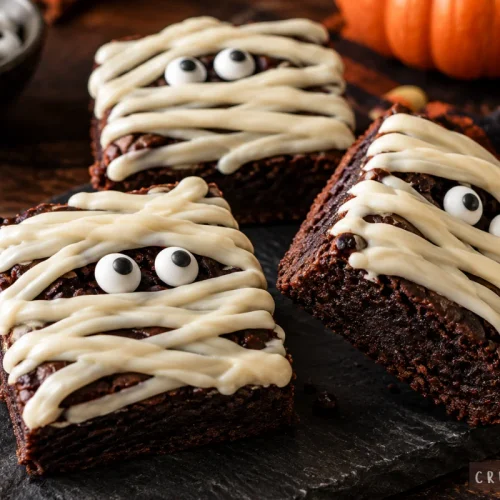
Fudgy chocolate brownies get “wrapped” in white chocolate strips with candy eyeballs peeking through. They’re a Halloween party staple because they’re rich, easy to transport, and instantly recognizable. ⭐ Top 5 Pick - Black Cat Cupcakes
Chocolate cupcakes topped with black buttercream ears and fondant faces turn a basic bake into an adorable party centerpiece. They take a little more piping practice but are always a hit with kids. - Meringue Ghost Cookies
Light, crisp meringue piped into little ghost shapes with chocolate chip eyes. They’re naturally gluten-free and melt-in-your-mouth, though the piping does take a steady hand. - Oreo Pumpkin Truffles
Crushed Oreos mixed with pumpkin puree and cream cheese, then dipped in white chocolate, make a creamy, no-bake truffle with real fall flavor. They freeze well, which makes them great for make-ahead parties. - Jack-o’-Lantern Rice Krispie Treats
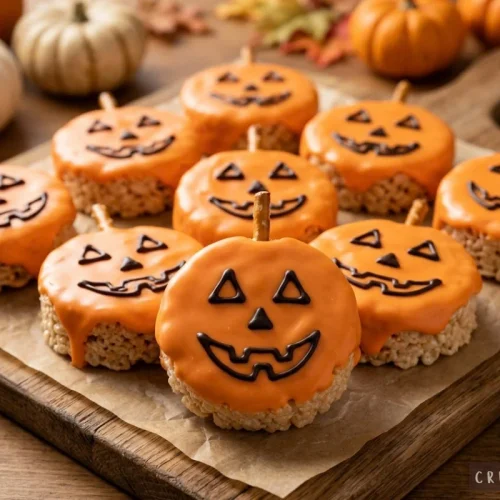
Classic rice cereal treats cut into rounds, dipped in orange candy coating, and given a simple chocolate face. They’re endlessly kid-friendly and come together with pantry staples. ⭐ Top 5 Pick - Witch Hat Cookies
Fudge-striped cookies topped with a chocolate kiss and a ring of orange icing create an instantly recognizable witch hat shape. No oven required, but the assembly takes patience if you’re making a large batch. ⭐ Top 5 Pick - Caramel Apple Slices
Sliced apples dipped in caramel and rolled in mini chocolate chips or chopped nuts give you all the flavor of a caramel apple without the sticky whole-apple mess. They’re a lighter, fresher option for the dessert table. - Pumpkin Mochi
This baked, gluten-free mochi has a chewy texture and warm pumpkin-spice flavor that feels a little different from typical Halloween sweets. It’s a great pick if you want a fall-forward, naturally gluten-free option on your table. - Monster Popcorn Mix
Popcorn tossed with candy eyeballs, green candy melts, and pretzels makes a salty-sweet snack mix that’s ready in minutes. It’s one of the fastest no-bake Halloween desserts to throw together for a crowd. - Chocolate-Dipped Pretzel Brooms
Pretzel rods dipped in melted chocolate and tied with a strip of fruit leather look just like witch’s brooms. They’re simple enough for kids to help assemble. - Spooky Eyeball Cake Pops
Cake crumbs mixed with frosting, rolled into balls, and dipped in white candy coating with a candy eyeball on top. They take more steps than most items on this list but are extremely Pinterest-friendly. - Pumpkin Chocolate Chip Cookies
Soft, spiced pumpkin cookies studded with chocolate chips are an easy, crowd-pleasing bake that doesn’t require any special decorating skills. They’re a reliable pick when you need dessert fast. - No-Bake Peanut Butter Spiderweb Bars
Peanut butter and oat bars topped with a melted chocolate spiderweb design. They’re a heartier, no-bake option that holds up well on a packed dessert table. - Graveyard Pudding Cups
Chocolate pudding layered with crushed cookie “dirt,” topped with a broken cookie “headstone.” It’s a fun, no-bake dessert that’s easy to portion into individual cups for a party. - Halloween Snack Mix Bark
A mix of pretzels, candy corn, and mini marshmallows set into a sheet of melted chocolate, then broken apart like traditional bark. It’s an easy way to use up leftover Halloween candy. - Mini Pumpkin Cheesecakes
Individual graham-crust cheesecakes swirled with pumpkin and warm spices. They bake in a muffin tin, which makes portioning and serving simple for a party. - Candy Corn Popcorn
Popcorn coated in a buttery candy-corn-flavored glaze, colored in yellow and orange layers. It’s a fun, shareable snack-dessert hybrid that always disappears fast at parties. - Halloween Whoopie Pies
Soft pumpkin or chocolate cake sandwiches filled with cream cheese frosting. They’re easy to bake in batches and can be decorated simply with orange or black sprinkles. - Pumpkin Roll Cake
A spiced pumpkin sponge rolled around a cream cheese filling. It looks impressive sliced but is more time-intensive than most items here, making it one of the list’s few intermediate bakes. - Halloween Popcorn Balls
Popcorn bound with a marshmallow syrup and shaped into balls, then rolled in Halloween sprinkles. They’re an old-fashioned, no-bake treat that’s easy to make ahead. - Candy Eyeball Chocolate Clusters
Melted chocolate studded with pretzels, nuts, and candy eyeballs, dropped by the spoonful onto parchment. This is one of the quickest desserts on the list with almost no cleanup. - Chocolate Peanut Butter Spider Cookies
Chocolate peanut butter cookies topped with pretzel “legs” and a candy eyeball. They’re a fun textural treat that combines salty and sweet in one bite. - No-Bake Pumpkin Spice Cheesecake Bites
Creamy pumpkin cheesecake filling rolled into bites and coated in graham cracker crumbs or white chocolate. They require zero oven time and taste like fall in one bite. ⭐ Top 5 Pick
The 5 Best Easy Halloween Desserts to Make
These five recipes rose to the top because they balance real ease of preparation with strong Pinterest appeal, genuine flavor, and enough variety that there’s something here for every kind of Halloween gathering, from a classroom party to a small adults-only get-together.
1. No-Bake Pumpkin Spice Cheesecake Bites A creamy, no-oven-required bite with warm pumpkin spice flavor. Difficulty: Easy. Prep time: about 20 minutes plus chilling. Main flavor appeal: pumpkin, cream cheese, and cinnamon. Readers will want to make this one because it requires no baking at all and travels well to any party.
2. Chocolate Spiderweb Bark A striking, two-ingredient-base treat that looks far more complicated than it is. Difficulty: Easy. Prep time: about 15 minutes plus 30 minutes to set. Main flavor appeal: rich dark and white chocolate. It’s the fastest recipe on this list, making it ideal for last-minute party prep.
3. Mummy Brownies A rich, fudgy brownie dressed up with a simple white chocolate “wrap.” Difficulty: Easy to moderate. Prep time: about 20 minutes, plus 28-30 minutes baking. Main flavor appeal: deep chocolate with a touch of vanilla sweetness from the wrap. This one earns its spot because it’s a genuinely great brownie underneath the decoration, not decoration for its own sake.
4. Jack-o’-Lantern Rice Krispie Treats A playful, kid-friendly update on the classic marshmallow treat. Difficulty: Easy. Prep time: about 15 minutes plus 30 minutes to set. Main flavor appeal: sweet marshmallow with a light orange candy coating. It’s an easy option for parents making treats with young kids.
5. Witch Hat Cookies A no-bake, assembly-style cookie that looks like it came from a bakery. Difficulty: Intermediate (the assembly takes patience for larger batches). Prep time: about 40 minutes for a full batch. Main flavor appeal: chocolate and cookie crunch with a touch of orange icing sweetness. It made the list because nothing else on it delivers this much visual payoff for essentially no baking.
Recipe #1: No-Bake Pumpkin Spice Cheesecake Bites
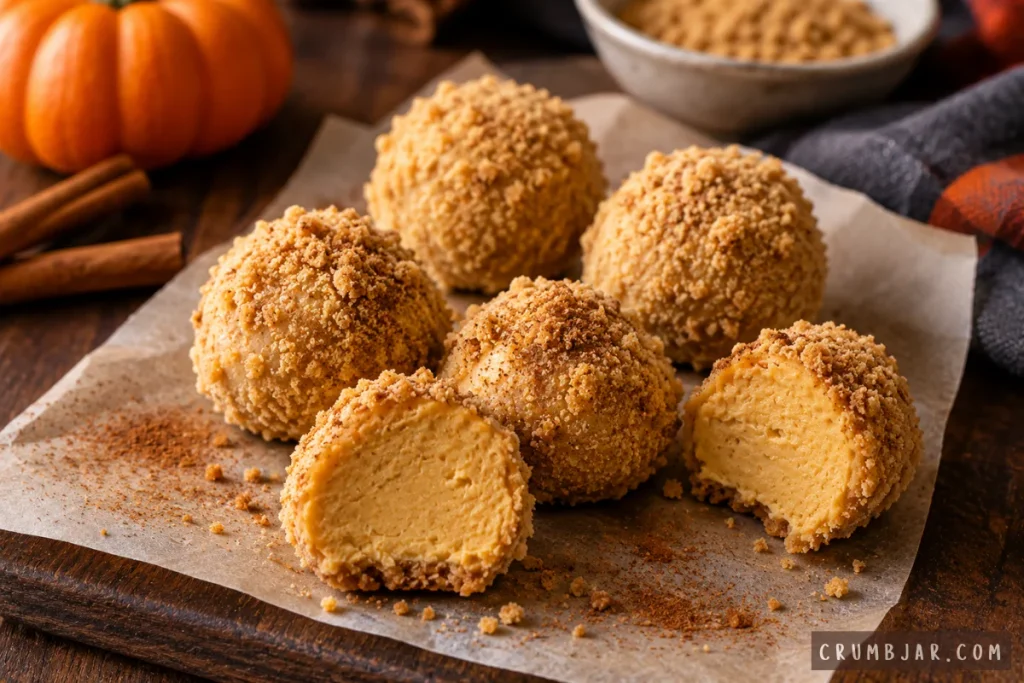
Recipe Overview
- Prep time: 20 minutes
- Chill time: 2 hours
- Total time: 2 hours 20 minutes
- Yield: 24 bites
- Difficulty: Easy
- Key flavors: Pumpkin, cinnamon, cream cheese, graham cracker
Ingredients
- 16 oz (450 g) cream cheese, softened
- 1 cup (120 g) powdered sugar
- 1/2 cup (120 g) pure pumpkin puree (not pumpkin pie filling)
- 1 1/2 tsp pumpkin pie spice
- 1 tsp vanilla extract
- 1 cup (100 g) graham cracker crumbs, for rolling
- Optional: 8 oz (225 g) white chocolate melting wafers, for dipping
Equipment
- Large mixing bowl
- Hand mixer
- Small cookie scoop
- Baking sheet lined with parchment paper
Instructions
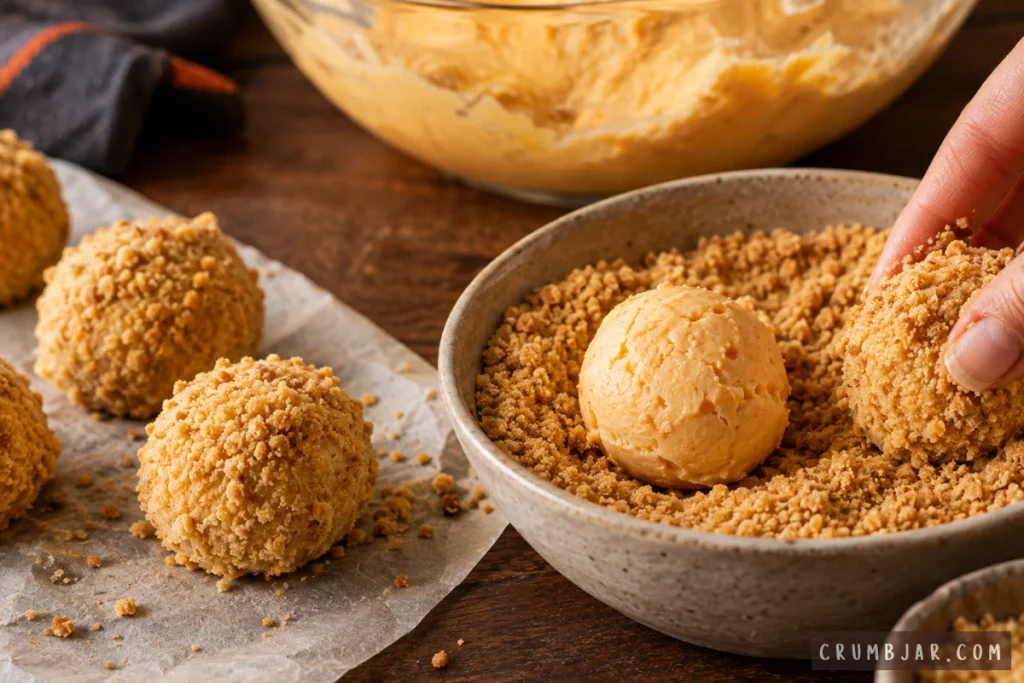
- In a large bowl, beat the softened cream cheese with a hand mixer on medium speed for about 1 minute, until completely smooth with no lumps.
- Add the powdered sugar, pumpkin puree, pumpkin pie spice, and vanilla extract. Beat on low, then medium speed for 1-2 minutes until fully combined and smooth.
- Cover the bowl and refrigerate the mixture for 30 minutes. This step is important, the mixture is too soft to shape straight away.
- Once firm enough to hold a shape, use a small cookie scoop to portion the mixture into 24 balls, rolling each briefly between your palms if needed. Place on the parchment-lined baking sheet.
- Roll each ball in graham cracker crumbs to coat, or dip in melted white chocolate (melted in 30-second microwave bursts, stirring between each, until smooth) and set back on the parchment.
- Refrigerate the finished bites for at least 1 1/2 hours, until firm to the touch, before serving.
Storage & Make-Ahead
Store the bites in an airtight container in the refrigerator for up to 5 days. They also freeze well for up to 1 month, thaw in the fridge for a few hours before serving.
Serving & Presentation
Arrange the bites on a platter lined with parchment or on a tiered stand for a party table. A light dusting of cinnamon or extra graham cracker crumbs over the top makes them look finished with almost no extra effort.
- If the mixture feels too soft to scoop even after chilling, pop it in the freezer for 10-15 minutes rather than adding more powdered sugar, which can make the bites overly sweet.
- Use full-fat cream cheese for the best texture, reduced-fat versions can turn the bites watery.
- Bites are sticky and won’t hold a round shape: Chill the mixture longer, and keep your hands cool by rinsing them in cold water between scoops.
- White chocolate coating seizes: This usually means water got into the bowl. Start over with a completely dry bowl and stir gently rather than vigorously.
No-Bake Pumpkin Spice Cheesecake Bites
Equipment
- Large mixing bowl
- Hand mixer
- Small cookie scoop
- Baking sheet
- Parchment paper
Ingredients
- 16 oz cream cheese, softened
- 1 cup powdered sugar
- 1/2 cup pure pumpkin puree not pumpkin pie filling
- 1 1/2 tsp pumpkin pie spice
- 1 tsp vanilla extract
- 1 cup graham cracker crumbs for rolling
- 8 oz white chocolate melting wafers optional, for dipping
Instructions
- In a large bowl, beat the softened cream cheese with a hand mixer on medium speed for about 1 minute, until completely smooth with no lumps.
- Add the powdered sugar, pumpkin puree, pumpkin pie spice, and vanilla extract. Beat on low, then medium speed for 1-2 minutes until fully combined and smooth.
- Cover the bowl and refrigerate the mixture for 30 minutes, until firm enough to shape.
- Use a small cookie scoop to portion the mixture into 24 balls, rolling each briefly between your palms if needed. Place on a parchment-lined baking sheet.
- Roll each ball in graham cracker crumbs to coat, or dip in melted white chocolate and set back on the parchment.
- Refrigerate the finished bites for at least 1 1/2 hours, until firm to the touch, before serving.
Notes
Calories per serving: ~110 kcal (estimated)
Recipe #2: Chocolate Spiderweb Bark
Recipe Overview
- Prep time: 15 minutes
- Chill time: 30 minutes
- Total time: 45 minutes
- Yield: About 20 pieces
- Difficulty: Easy
- Key flavors: Dark chocolate, white chocolate
Ingredients
- 10 oz (280 g) dark or semisweet chocolate chips
- 4 oz (115 g) white chocolate chips
- Candy eyeballs and Halloween sprinkles, for decorating (optional)
Equipment
- Baking sheet
- Parchment paper
- 2 microwave-safe bowls
- Toothpick or wooden skewer
- Offset spatula or the back of a spoon
Instructions
- Line a baking sheet with parchment paper.
- Melt the dark chocolate chips in a microwave-safe bowl in 30-second bursts, stirring after each, until smooth (about 1 1/2–2 minutes total).
- Pour the melted dark chocolate onto the parchment and spread it into an even layer, roughly 1/4 inch (6 mm) thick, using an offset spatula.
- Melt the white chocolate chips the same way, in 30-second bursts, stirring between each.
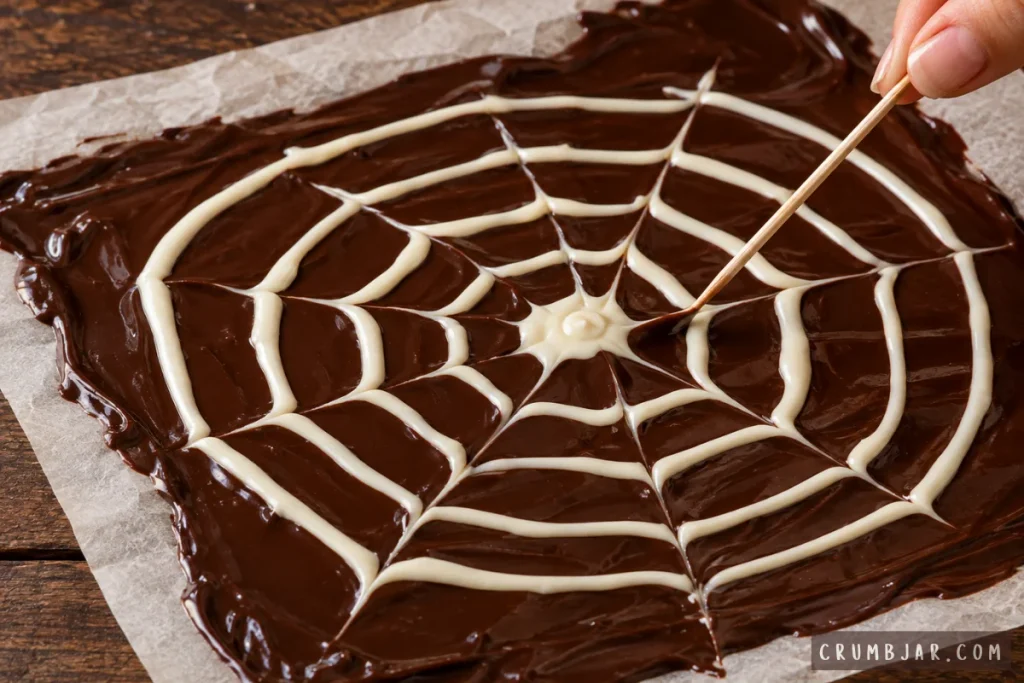
- Drizzle the melted white chocolate over the dark chocolate in concentric circles, starting from the center and working outward.
- Immediately drag a toothpick from the center circle outward to the edge in straight lines, spacing the lines evenly around the circle, to pull the white chocolate into a spiderweb pattern.
- While the chocolate is still wet, add candy eyeballs or sprinkles if using.
- Refrigerate for 30 minutes, or until fully set and firm.
- Break into rustic, irregular pieces by hand.
Storage & Make-Ahead
Store bark in an airtight container at cool room temperature for up to 2 weeks, or in the refrigerator for up to 1 month. Layer pieces between parchment to prevent sticking.
Serving & Presentation
Pile broken pieces onto a black or white platter for contrast, or bag individual pieces in cellophane treat bags for a party favor.
- Work quickly once the white chocolate is drizzled, it needs to still be wet when you drag the toothpick through it, or the web pattern won’t form.
- Tap the baking sheet gently on the counter after spreading the dark chocolate to release air bubbles and create a smoother surface.
- Chocolate seizes and turns grainy: This happens when moisture gets into the melted chocolate. Make sure your bowls and spatula are completely dry before starting.
- Web pattern looks blurry instead of crisp: The white chocolate may have been drizzled too thick, or the toothpick was dragged too slowly. Use a thin drizzle and quick, light strokes.
Chocolate Spiderweb Bark
Equipment
- Baking sheet
- Parchment paper
- Microwave-safe bowls
- Toothpick or wooden skewer
- Offset spatula
Ingredients
- 10 oz dark or semisweet chocolate chips
- 4 oz white chocolate chips
- candy eyeballs and Halloween sprinkles optional, for decorating
Instructions
- Line a baking sheet with parchment paper.
- Melt the dark chocolate chips in a microwave-safe bowl in 30-second bursts, stirring after each, until smooth, about 1 1/2-2 minutes total.
- Pour the melted dark chocolate onto the parchment and spread it into an even layer, about 1/4 inch thick, using an offset spatula.
- Melt the white chocolate chips the same way, in 30-second bursts, stirring between each.
- Drizzle the melted white chocolate over the dark chocolate in concentric circles, starting from the center and working outward.
- Immediately drag a toothpick from the center outward to the edge in straight lines, spacing the lines evenly around the circle, to pull the white chocolate into a spiderweb pattern.
- While the chocolate is still wet, add candy eyeballs or sprinkles if using.
- Refrigerate for 30 minutes, or until fully set and firm, then break into rustic, irregular pieces by hand.
Notes
Recipe #3: Mummy Brownies
Recipe Overview
- Prep time: 20 minutes
- Bake time: 28–30 minutes
- Cool time: 30 minutes
- Total time: About 1 hour 20 minutes
- Yield: 16 brownies
- Difficulty: Easy to moderate
- Key flavors: Rich chocolate, vanilla
Ingredients
- 1/2 cup (115 g) unsalted butter
- 1 cup (200 g) granulated sugar
- 2 large eggs
- 1 tsp vanilla extract
- 1/3 cup (30 g) unsweetened cocoa powder
- 1/2 cup (65 g) all-purpose flour
- 1/4 tsp salt
- 1/4 tsp baking powder
- 1 cup (170 g) white candy melting wafers or white chocolate chips, for the “wraps”
- 32 candy eyeballs
Equipment
- 8×8-inch (20×20 cm) baking pan
- Parchment paper
- Mixing bowls
- Whisk
- Piping bag or zip-top bag with the corner snipped
Instructions
- Preheat the oven to 350°F (175°C). Line the baking pan with parchment paper, leaving an overhang on two sides for easy removal.
- Melt the butter (microwave or stovetop), then whisk in the sugar until combined.
- Whisk in the eggs one at a time, then the vanilla extract, until the batter looks glossy.
- Sift in the cocoa powder, flour, salt, and baking powder. Fold gently with a spatula just until no dry streaks remain, do not overmix.
- Pour the batter into the prepared pan and spread evenly.
- Bake for 28–30 minutes, until the edges look set and a toothpick inserted in the center comes out with a few moist crumbs (not wet batter).
- Cool the brownies completely in the pan, about 30 minutes, before decorating, warm brownies will melt the white chocolate wraps.
- Once cool, lift the brownies out using the parchment overhang and cut into 16 squares.
- Melt the white candy wafers in 30-second microwave bursts, stirring between each, until smooth.
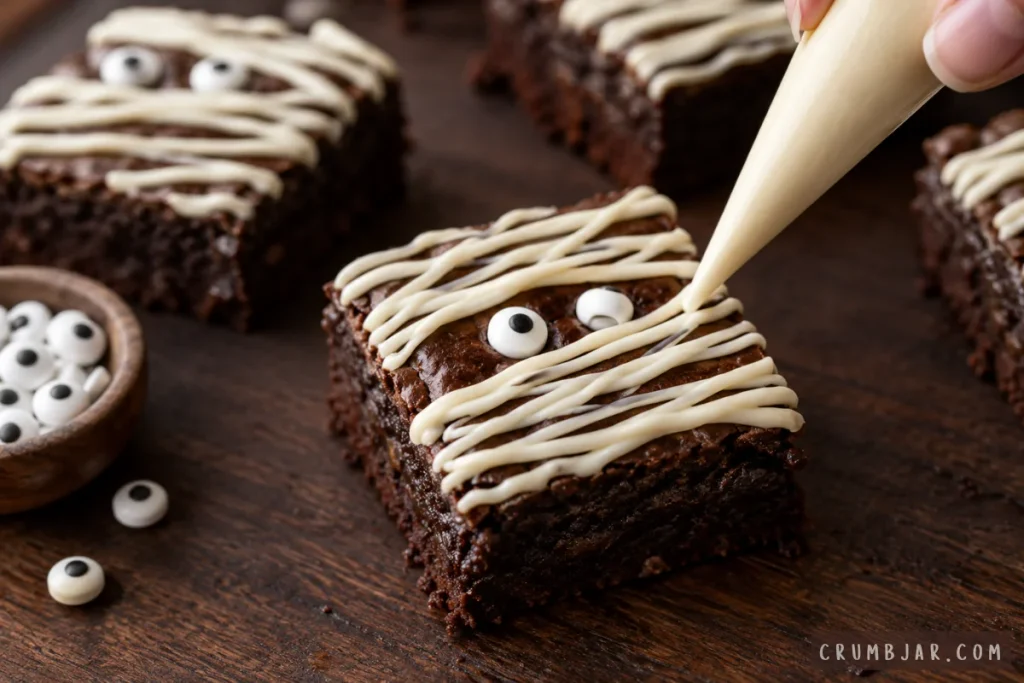
- Transfer the melted white chocolate to a piping bag and pipe back-and-forth strips across each brownie to look like mummy wrapping, leaving a gap for the eyes.
- While the chocolate is still wet, press two candy eyeballs into the gap on each brownie.
- Let the white chocolate set at room temperature for about 10 minutes before serving.
Storage & Make-Ahead
Store in an airtight container at room temperature for up to 4 days. The unfrosted brownies also freeze well for up to 2 months, thaw, then add the white chocolate wraps and eyeballs just before serving.
Serving & Presentation
Serve on a dark platter or cutting board so the white chocolate wraps stand out. These travel well, making them one of the easiest Halloween party treats to bring to a potluck or classroom party.
- Slightly underbaking (pulling the brownies when a toothpick still has a few moist crumbs) keeps them fudgy rather than cakey.
- Let the brownies cool fully before piping, this is the single biggest factor in getting clean mummy stripes.
- Brownies sink in the middle: This usually means they were slightly underbaked or the oven door was opened too early. Give them the full bake time and check doneness with a toothpick rather than a timer alone.
- White chocolate stripes won’t hold their shape: The chocolate may be too thin. Let it cool for a minute after melting so it thickens slightly before piping.
Mummy Brownies
Equipment
- 8×8-inch baking pan
- Parchment paper
- Mixing bowls
- Whisk
- Piping bag
Ingredients
- 1/2 cup unsalted butter
- 1 cup granulated sugar
- 2 large eggs
- 1 tsp vanilla extract
- 1/3 cup unsweetened cocoa powder
- 1/2 cup all-purpose flour
- 1/4 tsp salt
- 1/4 tsp baking powder
- 1 cup white candy melting wafers or white chocolate chips for the mummy wraps
- 32 candy eyeballs
Instructions
- Preheat the oven to 350°F (175°C). Line the baking pan with parchment paper, leaving an overhang on two sides for easy removal.
- Melt the butter, then whisk in the sugar until combined.
- Whisk in the eggs one at a time, then the vanilla extract, until the batter looks glossy.
- Sift in the cocoa powder, flour, salt, and baking powder. Fold gently with a spatula just until no dry streaks remain.
- Pour the batter into the prepared pan and spread evenly. Bake for 28-30 minutes, until the edges look set and a toothpick inserted in the center comes out with a few moist crumbs.
- Cool the brownies completely in the pan, about 30 minutes, before decorating.
- Lift the brownies out using the parchment overhang and cut into 16 squares.
- Melt the white candy wafers in 30-second microwave bursts, stirring between each, until smooth. Transfer to a piping bag.
- Pipe back-and-forth strips across each brownie to look like mummy wrapping, leaving a gap for the eyes, and press two candy eyeballs into the gap on each brownie while the chocolate is still wet.
- Let the white chocolate set at room temperature for about 10 minutes before serving.
Notes
Recipe #4: Jack-o’-Lantern Rice Krispie Treats

Recipe Overview
- Prep time: 15 minutes
- Set time: 30 minutes
- Total time: 45 minutes
- Yield: 12 treats
- Difficulty: Easy
- Key flavors: Sweet marshmallow, light orange candy coating
Ingredients
- 3 tbsp (42 g) unsalted butter
- 10 oz (280 g) mini marshmallows (about one standard bag)
- 6 cups crisp rice cereal
- 2 cups (340 g) orange candy melting wafers
- Black decorating icing or melted dark chocolate, for faces
- 12 small pretzel sticks or green fruit leather strips, for stems
Equipment
- Large pot
- 9×13-inch (23×33 cm) baking pan
- Round cookie cutter (about 2 1/2 inches)
- Parchment paper
- Small piping bag or toothpick, for faces
Instructions
- Line the baking pan with parchment paper and lightly grease it.
- Melt the butter in a large pot over low heat.
- Add the mini marshmallows and stir constantly until fully melted and smooth, about 3-4 minutes. Remove from heat.
- Add the rice cereal to the pot and fold gently until every piece is evenly coated in marshmallow.
- Transfer the mixture to the prepared pan. Using a piece of parchment or lightly buttered hands, press it into an even layer, press gently rather than packing it down hard, which keeps the treats soft.
- Let the treats cool for about 15 minutes, until firm enough to cut.
- Use the round cookie cutter to cut out 12 rounds.
- Melt the orange candy wafers in 30-second microwave bursts, stirring between each, until smooth.
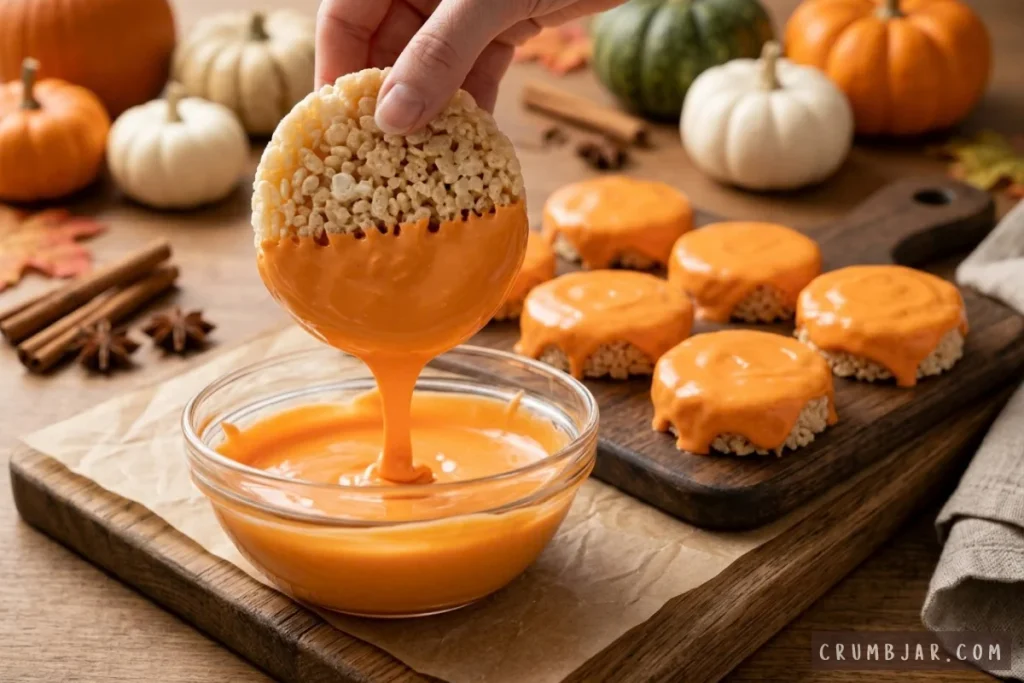
- Dip the top of each round into the melted orange candy, letting the excess drip off, and place back on parchment to set, about 10 minutes.
- Once set, pipe or draw a simple jack-o’-lantern face using black icing or melted dark chocolate.
- Insert a small pretzel stick or roll of green fruit leather into the top of each treat as a stem.
Storage & Make-Ahead
Store in an airtight container at room temperature for up to 3 days. These are best made within a day or two of serving, since rice cereal treats can soften over time.
Serving & Presentation
Arrange the treats stem-side up on a platter lined with orange or black parchment for a simple, festive presentation that kids especially love.
- Coat your hands or spatula with a little butter or nonstick spray before pressing the mixture into the pan to keep it from sticking.
- Work with slightly warm marshmallow mixture when pressing it into the pan, it firms up fast and gets harder to shape as it cools.
- Treats are too hard or dense: This usually means the mixture was packed too firmly into the pan. Press just until level, without compacting it.
- Orange coating cracks when dipped: The treats may be too cold. Let them sit at room temperature for a few minutes before dipping.
Jack-o’-Lantern Rice Krispie Treats
Equipment
- Large pot
- 9×13-inch baking pan
- Round cookie cutter
- Parchment paper
- Small piping bag
Ingredients
- 3 tbsp unsalted butter
- 10 oz mini marshmallows about one standard bag
- 6 cup crisp rice cereal
- 2 cup orange candy melting wafers
- black decorating icing or melted dark chocolate for faces
- 12 small pretzel sticks or green fruit leather strips for stems
Instructions
- Line the baking pan with parchment paper and lightly grease it.
- Melt the butter in a large pot over low heat.
- Add the mini marshmallows and stir constantly until fully melted and smooth, about 3-4 minutes. Remove from heat.
- Add the rice cereal to the pot and fold gently until every piece is evenly coated in marshmallow.
- Transfer the mixture to the prepared pan and press gently into an even layer.
- Let the treats cool for about 15 minutes, until firm enough to cut, then use the round cookie cutter to cut out 12 rounds.
- Melt the orange candy wafers in 30-second microwave bursts, stirring between each, until smooth.
- Dip the top of each round into the melted orange candy, letting the excess drip off, and place back on parchment to set, about 10 minutes.
- Once set, pipe or draw a simple jack-o’-lantern face using black icing or melted dark chocolate, and insert a small pretzel stick or roll of green fruit leather into the top of each treat as a stem.
Notes
Recipe #5: Witch Hat Cookies
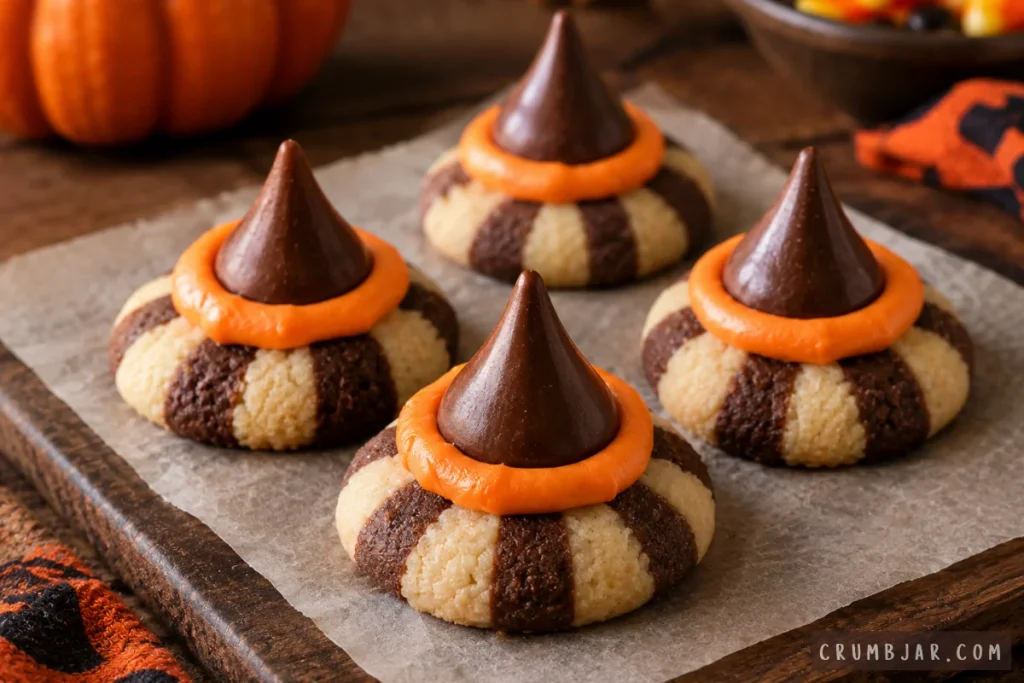
Recipe Overview
- Prep time: 40 minutes
- Set time: 15 minutes
- Total time: About 55 minutes
- Yield: 24 cookies
- Difficulty: Intermediate (no baking required, but assembly takes patience)
- Key flavors: Chocolate, cookie crunch, sweet orange icing
Ingredients
- 24 fudge-striped shortbread cookies
- 24 chocolate candy kisses, unwrapped
- 1/2 cup (85 g) dark or semisweet chocolate melting wafers
- Orange decorating icing (store-bought tube, or 1 cup powdered sugar mixed with 2-3 tsp milk and orange food coloring)
Equipment
- Baking sheet
- Parchment paper
- Piping bag or small zip-top bag with the corner snipped
- Small offset spatula or butter knife
Instructions
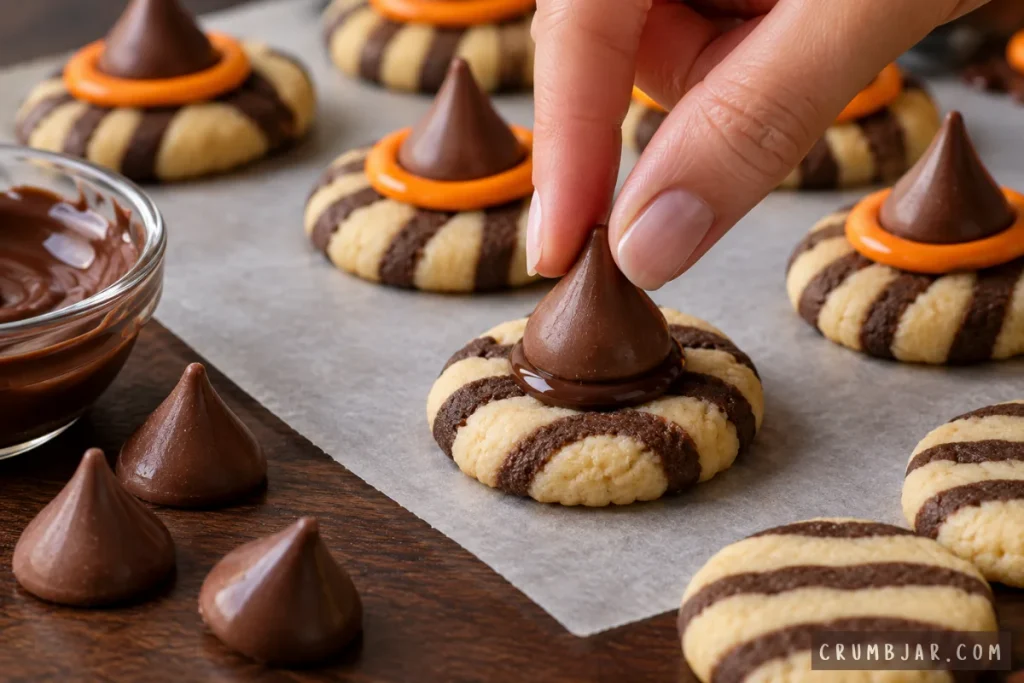
- Line a baking sheet with parchment paper and lay out the fudge-striped cookies fudge-side up.
- Melt the dark chocolate wafers in 30-second microwave bursts, stirring between each, until smooth.
- Dip the flat bottom of a chocolate kiss into the melted chocolate and immediately press it, point up, into the center of a cookie’s fudge side.
- Repeat with the remaining cookies and kisses, working in small batches so the chocolate doesn’t set before you use it.
- Let the cookies sit undisturbed for about 15 minutes, until the chocolate “glue” has fully set and the kiss is firmly attached.
- If using homemade icing, mix powdered sugar with milk a teaspoon at a time until you reach a pipeable consistency, then stir in orange food coloring until you reach the desired shade.
- Transfer the orange icing to a piping bag and snip a small opening in the corner.
- Pipe a ring of orange icing around the base of each chocolate kiss, where it meets the cookie, to create the “hat brim” look.
- Let the icing set for a few minutes before serving or packaging.
Storage & Make-Ahead
Store in a single layer in an airtight container at room temperature for up to 5 days. Avoid stacking until the icing is fully set, or the hats can stick together.
Serving & Presentation
Stand the cookies upright on a platter for a striking, dimensional display, these tend to be the first treat to disappear from a Halloween dessert table.
- Work in small batches of 4–5 cookies at a time so the melted chocolate stays workable and doesn’t harden before you’ve attached the kiss.
- If the chocolate kiss slides off-center, gently nudge it back into place within the first few seconds, after that, the chocolate sets too quickly to adjust.
- Kisses fall off the cookies: Not enough melted chocolate was used, or the cookies were moved before the chocolate fully set. Use a generous dab of chocolate and let the cookies sit undisturbed for the full 15 minutes.
- Icing ring looks messy: Thin the icing slightly with an extra few drops of milk for a smoother, more controlled piping consistency.
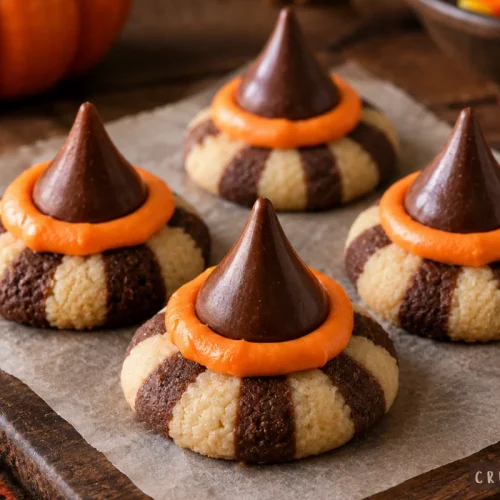
Witch Hat Cookies
Equipment
- Baking sheet
- Parchment paper
- Piping bag
- Small offset spatula or butter knife
Ingredients
- 24 fudge-striped shortbread cookies
- 24 chocolate candy kisses, unwrapped
- 1/2 cup dark or semisweet chocolate melting wafers
- orange decorating icing store-bought tube, or homemade: 1 cup powdered sugar mixed with 2-3 tsp milk and orange food coloring
Instructions
- Line a baking sheet with parchment paper and lay out the fudge-striped cookies fudge-side up.
- Melt the dark chocolate wafers in 30-second microwave bursts, stirring between each, until smooth.
- Dip the flat bottom of a chocolate kiss into the melted chocolate and immediately press it, point up, into the center of a cookie’s fudge side. Repeat with the remaining cookies and kisses, working in small batches.
- Let the cookies sit undisturbed for about 15 minutes, until the chocolate glue has fully set.
- If using homemade icing, mix powdered sugar with milk a teaspoon at a time until pipeable, then stir in orange food coloring until you reach the desired shade. Transfer to a piping bag.
- Pipe a ring of orange icing around the base of each chocolate kiss, where it meets the cookie, to create the hat brim look.
- Let the icing set for a few minutes before serving or packaging.
Notes
Which Dessert Should You Make?
- Best for beginners: No-Bake Pumpkin Spice Cheesecake Bites – no oven, no piping skills required.
- Best for a crowd: Mummy Brownies – easy to cut into many pieces and transport.
- Best make-ahead option: Chocolate Spiderweb Bark – keeps well for up to two weeks.
- Best quick option: Chocolate Spiderweb Bark – ready from start to finish in under an hour.
- Best impressive/showstopper option: Witch Hat Cookies – the most visually striking pick on the list.
- Best for kids to help with: Jack-o’-Lantern Rice Krispie Treats – simple steps that are easy for little hands.
If you’re planning a bigger fall spread beyond Halloween night, this list pairs well with our 25 Fall Dessert Recipes roundup, which covers the best easy picks for the whole season.
Conclusion
Halloween dessert tables don’t need to be complicated to feel special, sometimes a few well-chosen recipes make a bigger impression than a dozen half-finished projects. This list of 25 easy Halloween desserts is meant to give you plenty of room to browse, while the five featured recipes above are ready to go whenever you need something that’s genuinely simple, crowd-approved, and worth the counter space. Whether you’re after a five-minute no-bake bark or a slightly more hands-on cookie project, there’s a treat here for your Halloween party.
Which of these five would you make first?


Pingback: Easy Halloween Oreo Bark - Crumb Jar